Seafood Risotto & Tomato Beurre Blanc (w/ wine pairings)

Shrimp Risotto with Lobster

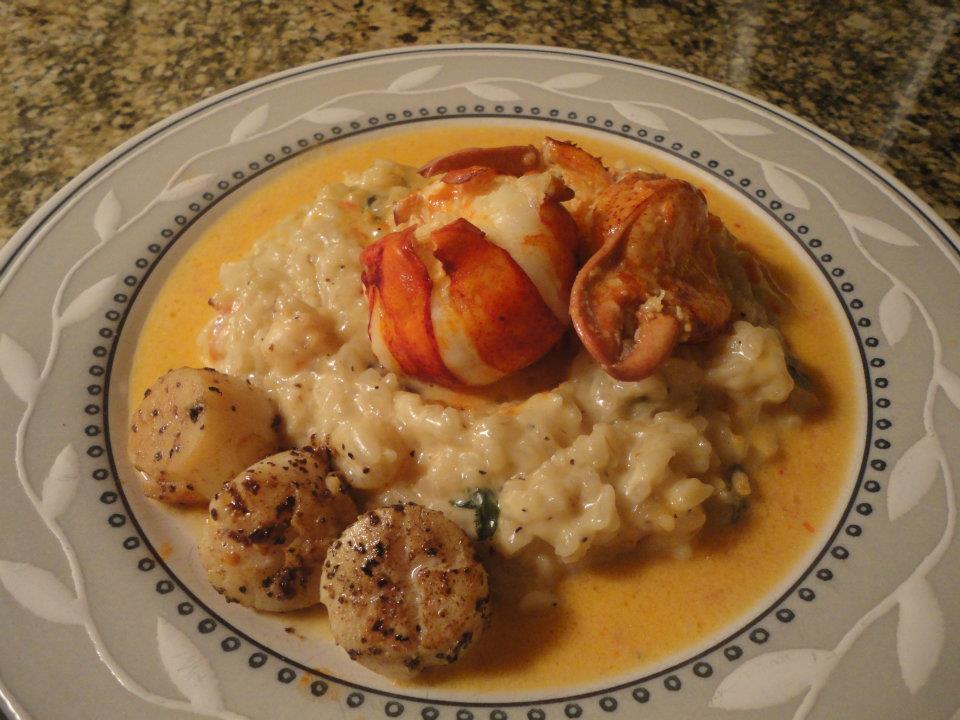
So I got a request this morning from one of my Facebook friends looking for some ideas for risotto. Immediately my mind went back to this dish that I had made some time back for my wife and myself… I pitched it to her and she liked the idea, so here it is.

Serves: 4 (or in Danielle’s case, 2 adults and 3 kids… haha)

Ingredients (sauce & lobster):
8tbsp Unsalted Butter
2c Diced Plum Tomato
2 Cloves Garlic, chopped
2c White Wine
2c Chicken Stock
1/2c Light Cream
2tsp Salt
1tsp Ground Black Pepper
2 1.25lb+ Live Lobster

Ingredients (risotto):
2tbsp Unsalted Butter
2c Arborio Rice
2c White Wine, room temperature
4c Chicken Stock
2tsp Salt
2tsp Ground Black Pepper
2tsp Garlic Powder
1/2c Chopped Fresh Basil
1lb Fresh Shrimp, shelled, deveined and diced
1/2c Grated Parmesan

Ingredients (scallops):
8 Large Sea Scallops (preferably U-10) (obviously you can adjust this as desired if you want more or less)
1.5tsp Salt
1.5tsp Ground Black Pepper
2tbsp Unsalted Butter
1/4c Chicken Stock

Alright, so there are a handful of different steps here, but it’s not tooooooo difficult. Some proficiency in the kitchen will help though… It’s really more about time management and accurately judging how long your risotto needs.

First thing’s first, get water boiling in a very large sauce pot for your lobsters. (Note: If you don’t have a very large sauce pot you could always cut the tails and claws from the live lobsters and solely boil those instead of the whole bodies.)  Also set up an ice bath, i.e. a large tub (or even your sink) with a combination of ice and cold water. You’ll need this to halt the cooking process on the lobster after par boiling.

Put your lobsters (or lobster pieces) in the pot and boil for 3 minutes. This will not cook the lobsters through, but it will cook the outside of the meat enough that you will be able to remove it from the shell. Remove the lobsters from the boiling water and immediately submerge in the ice bath. All to rest for 5 minutes so the lobster is cooled entirely. Once cooled remove the tail and claw meat from the shells, clean, and set aside in the refrigerator. I also do my best to get out any knuckle meat and use that in the risotto.

Next let’s work on the sauce. Melt 2tbsp (the remaining 6tbsp will be needed for the sauce later) in a medium sauce pot at medium-high heat, add your chopped garlic and lightly brown. Once the garlic is browned add your chopped plum tomato, salt, and ground black pepper. Cook the tomatoes until they begin to sweat, roughly 4 minutes. Increase the heat to high then add your white wine. Reduce the wine by half, then add your chicken stock, light cream and 6tbsp on butter, stirring the ingredients together. Bring the sauce to a boil then reduce the heat to low and allow to lightly simmer, stirring periodically.

In a small/medium sauce pot heat 4 cups of Chicken Stock to a simmer then reduce your heat to low. You don’t want it boiling and reducing, you just want it warm so you’re not lowering the temp on your risotto every time you add more liquid. You’ll understand in a second. Have a ladle handy…

Heat your oven to 350F.

So, now it’s time to start on the risotto. Read this paragraph very carefully… The KEY to good risotto is to cook it SLOWLY, stir it VERY REGULARLY, and to KEEP IT WET. (Note: Do not use the risotto shown in the photo above as a reference. That particular day I was in the mood for a richer, creamier rice , so I added a touch of heavy cream, which is not true risotto. The end product here should not look like that. Your final product should be slightly firm but moderately loose and naturally creamy, but not sticky, and when you put it on a plate or bowl you should be able to actually shift the risotto simply by moving the plate.) One other key to making good risotto, DO NOT SUBSTITUTE THE CHICKEN STOCK WITH WATER!!!! Stock adds flavor and richness, if you use water you’re just boiling rice. That is risotto blasphemy and I may never be able to talk to you again.

Bring a medium sauce pot to high heat and add your dry Arborio rice and heat, stirring constantly, to just slightly toast the rice. Add your white wine and allow to reduce by half, stirring regularly. Ladle some of your hot stock into the risotto and reduce heat to medium-low. Add your salt, pepper and garlic powder. As I stated above, you have to really stay on top of risotto and stir it very regularly. As the liquids cook down you’ll need to ladle more into the pot and keep stirring. By the time the risotto is done you will have very likely used all of the 4 cups of warm stock. Risotto is a labor of love. Low heat, stirring, adding stock, stirring, adding stock… for upwards of 40-45 minutes, or longer. Once you pass the 25 minute mark you’ll need to start periodically tasting your risotto for texture, to determine it’s doneness. It should be soft, but with the slightest firmness to it (not quite crunch) and have a slight creaminess.

Once you’ve been cooking the risotto for about 20 minutes it’s time to start working on your scallops. Salt and pepper your scallops. Bring a sautee pan to high heat and melt your butter. Add your scallops. You’ll want to sear them until they get a nice brown caramelization, roughly 4-5 minutes, then flip and repeat. Add your chicken stock to the sautee pan to deglaze, cooking for an additional 1 minute. Remove the scallops from the sautee pan and put in a baking pan and pour the liquid from the sautee pan over them. Allow them to rest at room temperature until we’re ready for them again.

Have you been stirring your risotto and adding stock?

Next, time to puree the sauce. Using a blender, food processor or hand emulsifier liquefy the sauce, removing all tomato and garlic chunks. Straining should not be necessary. Put the sauce back in the pot and put back on low heat. Grab your lobster out of the fridge. Cut the tails in half longways to make four pieces. Add your tails and claws to the tomato butter sauce, and increase heat to medium, stirring periodically.

Now add your chopped shrimp and 2tbsp of butter to the risotto… continue stirring regularly.

Put your seared scallops in the oven, cook for 10 minutes, this will give you nice medium scallops.

When the scallops have been in the oven for 5 minutes stir the chopped basil and grated parmesan into the risotto.  Give it a taste to check doneness as well as seasoning.

Once the 10 minutes for the scallops is up your risotto should also be done, time to get plating. The way I like to do it what is shown in the photo above. I set my risotto in the middle of the plate, top it with a piece of lobster tail and one claw, ladle some sauce around the edges and then place the scallops to the side. But hey, to each their own, if you have a different idea, go for it!

So let’s talk wine pairings… With this dish I personally prefer either a full bodied white, or a medium-to-full bodied Pinot Noir. If you’d like you could go with a lighter white that is higher in acid and minerality to help cut through the richness of the meal, but personally in this scenario I WANT the richness and don’t want to detract from it. So here’s what I think…

Sean Minor “Four Bears” Chardonnay, Central Coast, California – I’ve written about Sean Minor before, and I can promise you’ll see me write about him again. Sean and Nicole started the Sean Minor winery in 2005, and now have two tiers of wine, Sean Minor which is their higher end wines retailing around the $20 range, and also Sean Minor Four Bears (four bears after their four children) which is their slightly value driven wines (but still high quality). At my last restaurant I poured this wine by the glass, and not only was it well received, but it was also my best selling wine by the glass. A Chardonnay… at a steakhouse! I’ve always called this the “everybody Chardonnay”. It’s moderately full bodied and has a touch of creaminess and oak that some are looking for in a Cali Chardonnay, but it’s also got beautiful notes of tropical fruit, as well as balancing acidity and minerality. It has a touch of something that everybody who enjoys Chardonnay is looking for. I never once had someone complain about this wine, ever! For the price point you can’t go wrong with this wine, and with good sized production it can be found in most markets. (Retail $11-14)

Wedell Cellars “Wavertree” Pinot Noir, San Luis Obispo, California – Wedell Cellars was started by Maurice Wedell in 1994, with his first vintage producing a whopping 28 cases! Obviously he has since expanded production, but is still one of the little guys. The Wavertree Pinot Noir is a relatively new project for Maurice, made from 92% Pinot from his holdings in Salisbury Vineyard in Avila Valley (low evening temps, lots of morning fog, leads to great acidity and balance) and the remaining 8% is from Fiddlestix, one of California’s Cru vineyards for Pinot Noir. The wine is very interesting on the palate… Up front you get a real overt zing of acidity that then mellows mid-palate into notes of tart cherry, plum and overripe raspberry, along with subtle hints of oak, black pepper and allspice. The wine is aged on lees and undergoes 100% malolactic fermentation, so there is a pronounced creaminess and mouthfeel, as well as a slightly hot finish at 14.9% alcohol, but not off putting. Maurice produces roughly 2,200 cases per vintage, so it’s not exactly “out there” but it’s not like trying to find a four leaf clover either. It’s available in most major markets, for everyone else you can order through Wedell’s website. (Retail $21-26)

Peirson Meyer Sauvignon Blanc, Napa, California – Peirson Meyer is the brain child of Alan Peirson and Robbie Meyer, two men who were instrumental in making Peter Michael… well, Peter Michael. In 2001 they decided it was high time for them to go off on their own, and they started by creating L’Angevin, where they focused on Pinot Noir and Chardonnay, and then in 2005 started Peirson Meyer where they focused primarily on Cabernet Sauvignon, Chardonnay, and more recently Sauvignon Blanc. So right now you’re thinking “Hey Derek, you said FULL BODIED WHITES, what gives with recommending a Sauvignon Blanc!?” Yeah, you’ve never had this one. This is easily one of the most unique SB’s I’ve ever tasted. The mouthfeel on this wine is full, rich and decadent, not the light bright citrus bomb you’ve come to expect from Sauv Blancs. On the palate you have a medium-to-full body with notes of meyer lemon, kaffir lime, mint, aloe and crushed white flower, balanced with subtle oak and slightly subdued acidity, with a long finish. Think Sauvignon Blanc meets Napa Chardonnay and you’re on the right track. With only 240 cases it will be a bit of a hunt to find this wine, especially now that Antonio Galloni gave it 93 points increasing the demand tenfold… but if you can find it grab it, it will blow your mind! (Retail $29-35)

So that’s my recipe (thank Danielle for asking for it… assuming you like it), and those are my pairings, and that’s my story. I hope you’ve enjoyed the read, and I hope you try the recipe, or the wines, or both!

New posts coming within the next few days, but in the meantime go to the store, grab a bottle of something you’ve never had before, and expand your mind! Life is short, enjoy it!

Advertisement

Derek’s Chili (w/ wine pairings)

DSC02740

So I’m sitting here, staring out the window at the this dreary day that I know is only going to get worse (they’re calling for upwards of 15″ of snow… joy), feeling pretty bleh, and am trying to think of something to cook that will not only warm my stomach, but also my soul. I need a lift, ya know? Do I want to do soup, maybe New England Chow-dah (I always here my Aunt Gail’s voice when I think chowder, she is Gloucester, Mass through and through!)? How about a nice Minestrone? Then it hits me… Chili! I actually haven’t made my chili all winter, what the hell is wrong with me!?

Well, I’m not sure if it’s what’s for dinner, need to get clearance from the wife, ya know… but at the very least I wanted to share the recipe with you. Enjoy!

Serves: Your entire block
Cooking time: 8 hours

Ingredients:
4lb Pork Neck
1lb Andouille Sausage, ground
1 Large Red Onion, chopped
4 Cloves Garlic, chopped
3 Large Carrots, chopped
2 Green Bell Peppers, chopped
3 Jalapeno, deseeded and chopped
29oz Canned Cannelloni Beans, drained and rinsed
29oz Canned Red Kidney Beans, drained and rinsed
15oz Canned Black Beans, drained and rinsed
56oz Canned Diced Tomatoes
28oz Canned Peeled & Ground Tomatoes
12oz Tomato Paste
1tbsp Olive Oil
2c Full Bodied Red Wine
28oz Water
2tsp Salt
1tbsp Smoked Paprika
2tsp Ground Black Pepper
2tsp Red Chili Flakes
2tsp Garlic Powder
2tsp Onion Powder
2tsp Cayenne Pepper
2tsp Chili Powder

So let’s get started…

Heat your olive oil on high in a very large sauce pot and add your pork neck. Seared the outside of the pork, then reduce heat to medium and add your red onion, garlic, carrot, bell pepper & jalapeno, sprinkle with salt and cook until the vegetables are sweating. Increase the heat back to high and add your red wine, allow to reduce by 1/3, then add the water and canned tomatoes. Boil for 5 minutes, then reduce heat to low. Cook for 4 hours, stirring periodically.

After 4 hours remove the pork neck from the pot and use a fork to shred the meat from the bones. Also sift through the liquid using a slotted spoon to make sure that none of the bones are left in the pot. Add your shredded pork neck back into the pot, as well as the ground Andouille sausage, tomato paste and all remaining seasoning. Cook for 2 hours on low heat, stirring periodically.

After 2 hours have passed add your Cannellini, Kidney and Black beans. Cook for an additional 2 hours on low heat, stirring periodically.

So that’s it. By the end of the 8 hours you should have pretty thick, meaty chili. Ladle it into a bowl and enjoy! Top it however you like, whether it’s shredded cheddar, sour cream and chives… I personally like to add a bit of freshness by topping it with baby arugula and then some shaved cheese and pita points or crostini.

As far as wine pairings go, I tend to stay domestic with chili. To me chili is as American as apple pie, hot dogs and baseball… and by golly, I’ll drink American while I eat it! I personally prefer to go with old vine Zinfandels, full bodied Syrahs or funky field blends. So here goes…

Bedrock Wine Co. Old Vine Zinfandel, Sonoma Valley, California – This is what I paired with this dish the last time I made it a year ago. It’s no secret that I have a deep seeded love for anything made by Morgan Twain-Peterson… I mean did you read my article “California Wine Trends: Old is new”? Morgan is the son of the famous Joel Peterson (of Ravenswood fame), and I feel that Morgan is not only following in his father’s footsteps, but that very likely the student has become the master! Morgan’s passion is anything old vine. In this instance you’re looking at Zinfandel harvested from Bedrock Vineyard, Casa Santinamaria Vineyard, Monte Rosso Vineyard, Stellwagen Vineyard, Los Chamizal and Scatena, along with a smattering of other grapes like Carignan, Alicante Bouchet, and Petite Sirah. Your vine ages here range from a whopping 80-123 years old! Notes of macerated cherry, blackberry, pantry spice and subtle smoked meat play on the palate with a perfect balance of acidity, tannins and heat. Open this about an hour before serving. You may have a bit of difficulty finding this wine, with a case production of only 1,600 and some pretty high demand it doesn’t last long on shelves. If you can find it, buy a few bottles because after you drink the first you’ll be heartbroken if you can’t get more! (Retail $28-35)

Bucklin “Bambino” Old Hill Ranch Blend, Sonoma Valley, California – Will Bucklin is another advocate for old vine wines. He founded the Bucklin winery back in 2000 with three of his siblings, focusing on wines from the family’s Old Hill Ranch Vineyard that is one of the oldest in Sonoma, officially recognized as having been established in 1885, but rumors hint that the vineyard could be as old as 1852. The “Bambino” is exactly what it sounds like, the baby of the family. Made from vines planted in 1998 this is a blend of roughly 80% Zinfandel, and the remainder is Petite Sirah, Alicante Bouchet, Syrah, Grenache and Carignan. Despite having big flavor the wine is somewhat little light on its feet on the palate. You’ll find notes of cherry, blackberry, vanilla and fall spice with subtle hints of oak, surprising acidity and well integrated tannins. I’m sure much of the lightness comes from the fact that the alcohol only tips the scales at 13.3%. This is another wine that can be difficult to find, with only a bit more than 900 cases made per vintage, but it’s worth the effort to track down. (Retail $21-27)

Tensley Syrah, Santa Barbara County, California – Tensley Winery was created in 1998 and they have quickly established themselves as one of the premier Syrah producers in California. This particular Syrah is their entry level wine, made with grapes harvested from Mormann, Thompson, Tierra Alta, Colson Canyon and Camp Four vineyards. The thing that most impresses me with this wine is how it simultaneously exhibit depth and darkness as well as a touch of floral brightness and lift. On the palate you’ll discover notes of blackberry, plum, bitter chocolate, potpourri and ground black pepper with subtle acidity and chewy tannins that lead to a long lingering finish. Much like with Bedrock, this wine can be found as it has a case production exceeding 1,700, but you may have to hunt for it a bit. (Retail $22-28)

So that’s the story folk. Now you have my chili recipe and what I think you should drink with it. Do what you will! I’ll be writing to you again real soon (especially if there are 15″ on the ground tomorrow), in the meantime crack open a bottle of something awesome and relax. Life is short, enjoy it!

Potato Chowder & Bread Bowl

DSC03221

Well I don’t know where you are (being that there are people from five different continents periodically checking in), but where I am, it’s pretty darn cold! Weather like this puts me in the mood for things like chili, Sunday sauce… and chowder! Well, being that I already had ingredients for chowder in the house, that’s the direction I went.

Listed below is the recipe, as well as some pairing recommendations. Let me know if you try it out!

Serves 4-6 depending on portion size

Ingredients (chowder):
1 stick Unsalted Butter
1/3c All Purpose Flour
1c White Wine
1c Chicken Stock
2c Water
4c Milk
4 Large Potatoes, large chop
1 Large White Onion, sliced
3 Medium Carrots, large chop
1c Frozen Peas, thawed
1/2lb Deli Ham, chopped
1tbsp Salt
2tsp Ground Black Pepper
2tsp Garlic Powder
2tsp Crushed Red Pepper (optional)
3/4c Grated Parmesan Cheese

Ingredients (bread bowls, makes four):
2 envelopes Dry Active Yeast
1 1/4c Warm Water
1/2tsp Granulated White Sugar (for yeast activation)

4c All Purpose Flour
2tsp Salt
2tsp Granulated White Sugar
1tsp Dried Basil Flakes
1tsp Dried Parsley Flakes
1c Grated Parmesan Cheese
3tbsp Unsalted Butter, melted but not hot

1tsp Olive Oil (for bowl)
1tsp Olive Oil (for brush)
1 Large Egg, beaten

Heat a large sauce pot at medium heat, melt the stick of butter. Once melted add your flour and continuously whisk to form a roux, simmer until golden in color. Add white wine and continue to whisk, the roux and wine should form a thin paste. Add water, chicken stock and milk, whisk until the roux is fully integrated into the liquids. I suggest using a wooden spoon after whisking to scrape along the bottom of the pot to make sure that none of the roux stuck to the bottom. If this happens it could burn, giving an acrid flavor to your soup. Add your potatoes, onions and carrots, as well as your salt, pepper, garlic powder and crushed red pepper (optional for those that like some spice). Stir everything together, reduce heat to low, and cover. Cook for three hours on low, stirring periodically.

While the soup is cooking it’s time to work on the bread.

Preheat your oven to 350F. In a measuring cup, or bowl, or whatever vessel you want, mix your warm water, dry yeast and 1/2tsp sugar. Stir together and then set in a warm place… I typically use my stove top when the oven is at temp. It’s warm but not hot. If your stovetop gets too hot you’ll need to find an alternative, maybe right next to it. After 15 minutes you should have a nice bloom.

While waiting for the yeast to activate… In a mixing bowl combine your flour, salt, sugar, basil, parsley and parmesan. Add your yeast and water and mix at a low setting, using a bread hook attachment. Add your melted butter a little at a time, mixing thoroughly between doses. Once all of the butter is added increase the mixing speed to medium and allow to mix for 5 minutes. You’ll have to use some of your own judgment here… if the dough seems too wet add just a touch more flour, too dry more water. But be careful, you don’t want something that is too dense. Once it’s done mixing it should have a medium density with a slight tackiness to the touch.

Turn your dough out onto a lightly floured surface and knead for 6-8 minutes until you have a good elastic consistency. Place into an oiled bowl, cover with plastic wrap and a towel and set in a warm, draft free place. Once again, I use my stovetop, but as I said earlier, if your stovetop gets too hot find an alternative. You do not want to start cooking the edges of your dough, you’ll ruin the batch. Rest your dough until it doubles in size, roughly one hour or slightly more.

After risen, once again turn it out onto a lightly floured surface and cut into four equal portions. Lightly knead each portion for less than a minute and form into a ball. Place the balls onto baking sheets lined with wax paper (you’ll want to use two, with two balls on each, unless you have a very large baking sheet). Cover the dough with dry towels and once again set in a warm, draft free place. Allow to rise again for 30 minutes.

In a bowl beat your egg and olive oil. Brush the individual dough balls with the mixture, then make cross slices on the top with a sharp knife to give the dough room to rise in the oven. They don’t have to be deep cuts, you’re simply scoring the dough so when it rises the pressure has a direction. Cook at 350F for 35 minutes, you’ll know it’s done when you tap the bowls and they sound hollow. Remove from heat and allow to rest.

Once the bread bowls have cool slice off a thin section of the top and core out the interior of the bowl. Set the “guts” aside, serve with the soup for dipping.

Ok, back to the soup… With 10 minutes remaining add your frozen peas, chopped ham and grated parmesan cheese. Stir until the cheese is melted into the soup.

After the three hours is up, remove from heat, ladle into your bread bowls, and enjoy!

Sooooo… as far as wine pairings go for this, I actually lean towards a medium bodied white with subtle acidity and minerality. You can go red here, with the richness, and ham, and potatoes… but I personally prefer something that will cut through all of that. How about this, I’ll add a red to the list that will work. Good? Ok good.

Eyrie Vineyards Pinot Gris, Willamette Valley, Oregon, USA – Eyrie is one of the true icons of wine in the United States. When David Lett started Eyrie back in 1970, he was one of the first to plant Pinot Noir in Willamette Valley, the first to plant Chardonnay in Willamette Valley, and the first person to plant Pinot Gris (Pinot Grigio) in the ENTIRE UNITED STATES. His entry level PG is still predominantly from those original vines, though there has been some replanting along the years. Despite being stainless aged, the wine has great depth and mouthfeel, between being predominantly mature vines, as well as undergoing 100% malolactic fermentation in tank. This is what allows the wine to stand up to the chowder, but the fruit, acidity and minerality help cut through the richness. Just be warned, this one may be hard to find with only 3,000 cases made per vintage! ($17-21 retail)

Château Cantelaudette Graves de Vayres Blanc Prestige, Bordeaux, FR – Cantelaudette is relatively small production, with only about 10,000 cases made per vintage of their Blanc. For those not familiar, Graves de Vayres is not actually a satellite appellation of Graves, but rather is the northernmost part of the Entre Deux Mers appellation overlooking the Dordogne River. This estate was established by the Chatelier family in 1870, and is considered one of the top values in the region. Most Bordeaux Blancs are predominantly Sauvignon Blanc, however, 85% of the blend in Cantelaudette is Semillon, adding significant weight and complexity to this wine. This allows it to stand up to the depth of the chowder, but the bit of Sauvignon Blanc and Muscadelle give it the lift and acidity you need to cut through the richness. This wine is an amazing bargain! ($12-15 retail)

Bodegas Hermanos de Peciña Cosecha – Peciña has recently become on of my favorite Rioja producers. Though relatively young, the vineyard was started in 1992 and their first vintage was 1998, they have a great pedigree. Pedro Peciña was the winemaker and lead enologist for La Rioja Alta for upwards of 30 years, which speaks volumes! Their Cosecha is their entry level red, entirely unoaked (known as a Joven). This wine, with 95% Tempranillo, is very traditional in style but the stainless aging lends a freshness to it. It has beautiful fruit up front while still maintaining balancing acidity and a round tannic backbone. This is one you don’t buy just a bottle, you buy the case! ($11-13 retail)

DSC03222

Cinnamon Pull Apart Bread

Cinnamon pull apart bread (recipe available)

So one of my absolute favorite sweets right now is this cinnamon pull apart bread. I will admit, I stumbled across it online a short time ago so this is not a Derek original, though I did make some changes here and there. Listed below is the recipe and pairings… let me know what you think!

Ingredients (Dough):
3c All Purpose Flour
1 envelope Active Dry Yeast
1/2tsp Granulated White Sugar (for yeast)
1/4c Granulated White Sugar (for dough)
1tsp Vanilla Extract
1/2tsp Salt
2 Eggs, beaten
1/2c Warm Milk
1/3c Warm Water
1 stick Unsalted Butter, melted but not hot
2tsp Vegetable Oil

Ingredients (Filling):
1 1/2c Dark Brown Sugar
1/2c Granulated White Sugar
1tbsp Ground Cinnamon
2tsp Ground Nutmeg
1tsp Fresh Ground Black Pepper
4tbsp Unsalted Butter, melted

Directions:
Preheat oven to 350F

In a measuring cup or bowl combine your warm milk and water (100-115F). Stir in the yeast and 1/4tsp of sugar. Place the measuring cup in a warm place (I put it on the stovetop while the oven is preheating) and allow the yeast to activate, roughly 15 minutes. The liquid should be creamy and have a significant bloom on top.

In a mixing bowl, combine the sifted flour, sugar, and salt. Add your beaten eggs, vanilla and yeast mixture and begin mixing, starting at a slow speed and working up to medium. Add the melted butter gradually (in 4 or 5 increments), mixing the dough after each addition. The dough becomes sticky but avoid adding flour unless the dough is wet after mixing. Once done mixing the dough should be relatively firm but slightly tacky to the touch.

Transfer the dough on a lightly floured work surface. Knead for 6 to 8 min until you have a smooth, elastic dough.

Place the dough in a lightly oiled bowl and cover with a towel. Place the bowl in a warm, draft free, location to allow the dough to rise. Once again, I use my stovetop while the oven is heated. However, if you use your stovetop or any other form of direct heat (heating pad, etc.), make sure it’s not too hot. You do not want to start cooking the outside of your dough, it will ruin the batch. Allow the dough to rise until doubled in size, approximately 1-1.5 hours (it has taken as long as 2 hours for me before).

While the dough is rising make your filling. In a medium bowl mix your brown sugar, granulated sugar, cinnamon, nutmeg and black pepper until well integrated. Break apart any brown sugar clumps.

Once the dough has risen, turn it back out onto a lightly floured surface. Knead briefly (3 or 4 folds) to get excess air out of the dough. Begin flattening the dough into a rectangle with the heels of your hands, then finish using a rolling pin. You want a rectangle roughly 12” x 20”. Brush the rectangle with butter, then evenly spread your sugar & spice filling.

Lighty grease (using butter or shortening) a 5”x9” baking pan (standard bread pan).

Using a knife or pizza cutter, cut the dough into six even strips along the short side. Layer the strips of dough on top of each other, and cut into four separate rectangles 4” long. Stand the rectangles vertically in the greased dish, staggering slightly to fill as much space as possible. Cover with plastic wrap and set aside at room temperate to rise until it fills the dish, approximately 45 minutes.

Cover with plastic wrap and let stand about 45 minutes or until the dough reaches at least the edge of the mold (it does not double volume swells but enough).

Uncover and place in the 350F oven for 35 minutes, the top should be well browned. You do not want to undercook or you will have raw dough in the center and bottom. Let’s face it, everybody’s oven is different, and 350F isn’t the same for all of them. I know for mine if I want 350F I need to set it to 365F. You know your oven and its quirks, you’ll have to make some judgement calls on your own here.

Once done remove from heat and let rest for 15 minutes before serving. Enjoy!!!

Oh, and one thing to note… this is NOT for people watching their figure. It’s beyond delicious, but your scale might say “OUCH” when you step on it tomorrow. haha…

 As far as wine pairings are concerned… I would go with a nice Tawny Port or Madeira. I personally prefer ports from Niepoort (their 10yr Tawny was called “the golden standard” of tawny ports by Wine Spectator), Casa de Santa Eufemia, Quinta do Noval (their 1968 Colheita is life-changing good!) or Quinta do Infantado. As far as Madeira you can’t go wrong with Rare Wine Company, preferably their New York Malmsey or Boston Bual.

%d bloggers like this: